
|
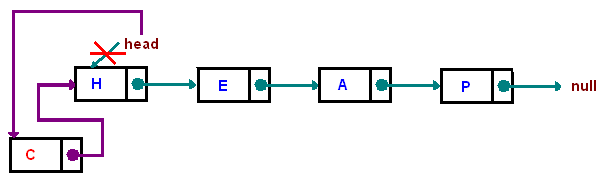
To add an item/node to the front of the list (i.e., the end referenced by head), one can use code similar to the following. Note, in combination with a method to remove the first item/node previously discussed, you have the basic elements for a linked list implementation of a stack.
public void addFirst(Item item) {
   Node n = new Node();
   n.item = item;
   n.next = head;
   head = n;
}
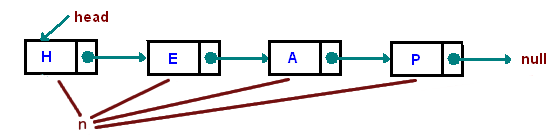
To do something to each element of a list (inspect it, modify it, etc.), we can traverse the list using something similar to the modified for-loop below.
for (Node n = head; n != null; n = n.next) {
   // process n.item
}
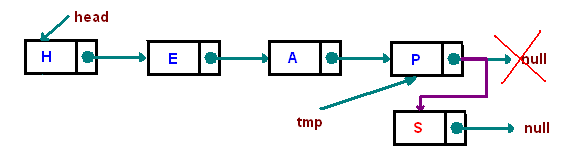
To add an item/node to the end of the list will require traversing the entire list (unless you also keep a reference to the last element as an instance variable). The trick is to remember to stop on the last node, and not on null, as it is this last node whose reference must be changed to accomplish the addition.
public void addLast(Item item) {
   Node newEnd = new Node();
   newEnd.item = item;
   newEnd.next = null;

   if (head == null)
      head = newEnd;
   else {
      Node tmp = head;
      while (tmp.next != null)
         tmp = tmp.next;
      tmp.next = newEnd;
   }
}
Note, having to traverse the entire list is very inefficient -- just think of how much wasted time would be involved if your list was a million nodes long! Truly, the better way to do this is to add an instance variable (perhaps called tail) to the LinkedList class that keeps a reference to the last element of the list, as the below code demonstrates:
public void addLast(Item item) {
   Node newEnd = new Node();
   newEnd.item = item;
   newEnd.next = null;

   if (head == null)
      head = newEnd;
   else
      tail.next = newEnd;

   tail = newEnd;    // don't forget to update tail!
}
Expanding the instance variables of any class should always be done cautiously, however! One must consider the cost and potential inefficiencies of having to update this new instance variable in all of the other methods the class employs.
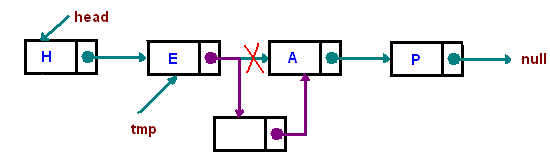
To insert a node/item just after the first node in our list that contains some key item, we can traverse the list until the key is found and then adjust the references appropriately, as the below accomplishes. Note, if the key is not found -- for simplicity's sake -- the method below simply doesn't insert anything. One could let the client know this by returning a boolean to indicate whether or not the insertion happened. One could also throw an exception upon a failed insertion, if that was more appropriate.
public void insertAfter(Item key, Item itemToInsert) {
   Node nodeToInsert = new Node();
   nodeToInsert.item = itemToInsert;

   Node tmp = head;
   while ((tmp != null) && (! tmp.item.equals(key)))
      tmp = tmp.next;

   if (tmp != null) {
      nodeToInsert.next = tmp.next;
      tmp.next = nodeToInsert;
   }
}
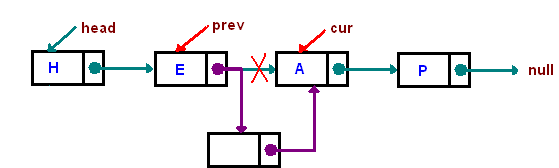
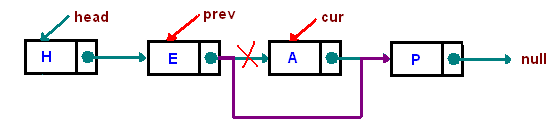
Suppose one wished to insert a node/item just before the first node in our list that contains some key item. In this case we could, for the sake of convenience, maintain two references previous and current, so that as we traversed the list, looking for the key, we shifted these two references in tandem, always keeping previous one node before current. Then upon current reaching the node containing the key, we use both of these references to accomplish the insertion between them, as the code below indicates. (Note, in the code below -- as with the previous example -- if the key is never found, no insertion is made.)
public void insertBefore(Item key, Item itemToInsert) {
   Node nodeToInsert = new Node();
   nodeToInsert.item = itemToInsert;

   Node previous = null;
   Node current = head;

   while (current != null && (! current.item.equals(key))) {
      previous = current;
      current = current.next;
   }

   if (current != null) {
      if (current != head) {
        previous.next = nodeToInsert;
        nodeToInsert.next = current;
      }
      else {
        head = nodeToInsert;
        head.next = current;
      }
   }
}
To delete some key item (and its corresponding node) from the list, we again find it convenient to maintain two references previous and current. However, one should note that things must be handled differently when the key is found at the head of the list, as previous will still be null. (Here again, for simplicity's sake -- if the key is never found, nothing happens.)
public void removeFirstOccurrence(Item key)
{
   Node previous = null;
   Node current = head;

   while (current != null && (! current.item.equals(key))) {
      previous = current;
      current = current.next;
   }

   if (current != null) {
      if (current == head)
         head = head.next;
      else
         previous.next = current.next;
   }
}
One can provide (sequential) access to the data stored in the list, while still hiding the underlying representation by adding an inner class that implements the Iterator interface and a iterator method, so that the LinkedList class can implement the Iterable interface, as the below code demonstrates.
public class LinkedList- implements Iterable { private static class Node { Item item; Node next; } private Node head; ... public class HeadToTailIterator implements Iterator { Node node = head; public boolean hasNext() { return (node != null); } public Item next() { Item itemToReturn = node.item; node = node.next; return itemToReturn; } } public Iterator iterator() { return new HeadToTailIterator(); } }
Original images and some text by Victor S.Adamchik, CMU, 2009; adapted by P. Oser