|
The exercises below require the use of the breadboards.jar package.
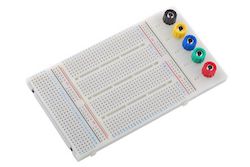
Inspired by electronic breadboards (like the one shown at right), where one can rapidly layout a circuit for testing -- the library above is intended to advance first-year java students' abilities to quickly create interesting graphics-based programs as early as possible.
Write a class named HelloBreadboardGraphics that extends the class Breadboard and creates and adds to the canvas of it's window a rectangle whose upper left corner is at (0,0) and has width and height are 50 and 100 pixels, respectively. This class should then also construct an oval whose upper left corner is at (25, 25), also with a width and height of 50 and 100, respectively. This oval should be shown with its interior filled in so that the entire oval appears red in color.
import java.awt.Color;  // this allows use of the constant "Color.RED" below

import breadboards.Breadboard;
import breadboards.GOval;
import breadboards.GRect;

public class HelloBreadboardGraphics extends Breadboard {

   public void onButton1Click() {
      //note, the below code executes (and thus draws things)
      //only when the user has clicked the button labeled "Btn1"

      //construct a rectangle whose upper left corner is at (0,0)
      //and with width 50 and height 100; reference it with a variable
      //named myRect and add it to the graphics window
      GRect myRect = new GRect(0,0,50,100);
      this.add(myRect);

      //construct an oval whose upper left corner is at (25,25)
      //and with width 50 and height 100; reference it with a variable
      //named myOval; set things so that when drawn on the screen its
      //interior will be filled in and the entire oval will be red in color;
      //and then add it to the graphics window.
      GOval myOval = new GOval(25,25,50,100);
      myOval.setFilled(true);
      myOval.setFillColor(Color.RED);
      this.add(myOval);
   }

   public static void main(String[] args) {
      new HelloBreadboardGraphics();
   }

}
Complete the following starter code to draw a clown face of your own design. The only restrictions are that you must use one or more of each of the following classes, found in the breadboards.jar package.
import breadboards.*;
import java.awt.Color;

public class FaceDrawer extends Breadboard {

	public void onButton1Click() {

	    // put some text describing this work of art in the text box
	    // at the top of the window
	    this.getTextArea().setText("Clearly, the next Picasso!");

            //code to create face...
	}

        public static void main(String[] args) {
            new FaceDrawer();
        }
}

import breadboards.*;
import java.awt.Color;

public class FaceDrawer extends Breadboard {

  public FaceDrawer() {

      // put some text describing this work of art in the text box
      // at the top of the window
      this.getTextArea().setText("Clearly, the next Picasso!");

      //add lines, rectangles, and ovals to create face...
      GLine leftLine = new GLine(150,200,150,130);
      GLine rightLine = new GLine(300,200,300,130);
      GLine topLeft = new GLine(150,130,225,110);
      GLine topRight = new GLine(225,110,300,130);
      GLine bottomLeft = new GLine(150,200,225,250);
      GLine bottomRight = new GLine(225,250,300,200);
      this.add(leftLine);
      this.add(rightLine);
      this.add(topLeft);
      this.add(topRight);
      this.add(bottomLeft);
      this.add(bottomRight);

      GRect leftEye = new GRect(170,140,10,10);
      leftEye.setFilled(true);
      leftEye.setFillColor(Color.BLUE);
      this.add(leftEye);

      GRect rightEye = new GRect(250,140,10,10);
      rightEye.setFilled(true);
      rightEye.setFillColor(Color.BLUE);
      this.add(rightEye);

      GOval nose = new GOval(210,160,20,20);
      nose.setFilled(true);
      nose.setFillColor(Color.RED);
      this.add(nose);

      GLine leftMouth = new GLine(170,180,225,230);
      GLine rightMouth = new GLine(225,230,260,180);
      this.add(leftMouth);
      this.add(rightMouth);
  }

  public static void main(String[] args) {
      new FaceDrawer();
  }
}
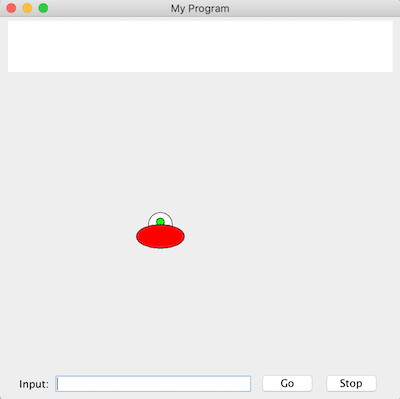
Write a class named SpaceTest that extends the Breadboard class, adds a GSpaceship to the screen, and relabels button1 and button 2 to "Go" and "Stop", respectively. Lastly, clicking on the "Go" button should make the spaceship drawn move to the right, while clicking on the "Stop" button should make the spaceship stop.
public class SpaceTest extends Breadboard {

  GSpaceship spaceship;

  public SpaceTest() {
    this.spaceship = new GSpaceship(200,200);
    this.add(spaceship);
    this.getTimer().setDelay(30);
  }

  public void onTimerTick() {
    this.spaceship.move(1, 0);
  }

  public void onButton1Click() {
    this.getTimer().start();
  }

  public void onButton2Click() {
    this.getTimer().stop();
  }

  public static void main(String[] args) {
    SpaceTest t = new SpaceTest();
    t.getButton1().setText("Go");
    t.getButton2().setText("Stop");
  }
}
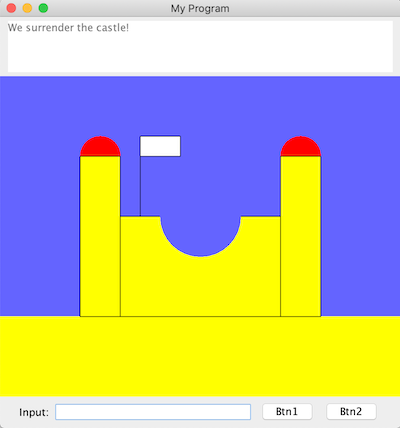
Write a class named SandCastle that extends the Breadboard class and draws a picture of a sandcastle on the canvas of the breadboard, subject to the following:
The size of the breadboard should be such that the central canvas area is 500 pixels wide and 400 pixels high, with a yellow rectangle (representing sand) that is 500 pixels wide, whose upper left corner is at (0, 300), and with a height chosen so that it just covers the bottom visible portion of the canvas (i.e., if you drag the bottom right corner of the window farther down and to the right, no additional yellow is revealed.).
The background of the breadboard should be blue (so that it looks like "sky").
The sandcastle drawn should include at least one object of each of the following types: GRect, GOval, and GLine.
Some message should be displayed in the text area of the breadboard.