
|
An event can be defined as a type of signal to the program that something has happened.
In event programming, the flow of the program is determined by various events that are initiated either by user actions or by other programs (e.g., Mouse clicks; keystrokes; windows being closed, etc...)
There are three things to consider when writing an event-driven program:
The objects that listen for, and react to events are called "event listeners" or "event handlers". They must be both defined AND "attached" to the event source(s) to which they are listening to function properly. You might visualize an event listener object as a large "ear" that we can stick on another object -- like a JButton, for example.
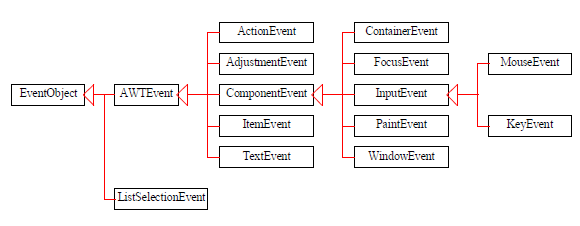
There are many different types of events for which one can listen, with many being subclasses of others as suggested by the diagram below:
The table below shows some of the more common user actions to which a program might need to respond. In each case, the table shows the event type(s) generated, as well as the type of the source object that generates the event.
| User Action | Event Type Generated | Source Object |
| Click a button | ActionEvent | JButton |
| Mouse button pressed, released, etc... | MouseEvent | Component |
| Key pressed, released, etc... | KeyEvent | Component |
| Window opened, closed, etc... | WindowEvent | Window |
| Press return on a text field | ItemEvent, Action Event | JTextField |
| Click a check box | ItemEvent, ActionEvent | JCheckBox |
| Click a radio button | ItemEvent, ActionEvent | JRadioButton |
| Selecting a new item from a combo box | ItemEvent, ActionEvent | JComboBox |
Let's see how all of these things are connected -- consider the following:
Suppose we wish to be able to react to a user clicking a JButton object. In this case, the JButton object is considered to be the source object. We will want to "put an ear on" this source object, so that we can "hear" the event triggered as a result of the click.
We need a special type of "ear", however. In this case, we note that JButton objects create ActionEvent objects when clicked, so we will need an "ear" object that implements the ActionListener interface. More generally (as shown on the below diagram), if we expect an event of type "XEvent", we will need an "ear" object that implements an "XListener" interface.
Consequently, we create a custom ListenerClass that implements an ActionListener/XListener, and then instantiates an object of that class called "listener" (this is our "ear" object).
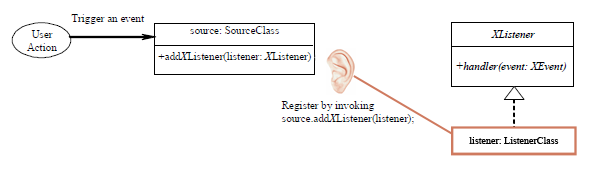
The custom ListenerClass will have to contain an appropriate handler method(s) to react to the event -- as required by the ActionListener/XListener interface. In the case of a custom ListenerClass that implements the ActionListener interface, the single handler is given by the actionPerformed(event: ActionEvent) method.
It is not enough just to create a "listener" object with an appropriate handler method, however. We must tell the source (i.e., the JButton in this case) to whisper in the ear of that listener every time an XEvent (an ActionEvent in this case) is triggered.
Interestingly, a particular source object can "whisper in the ear" of several listeners listening to it. In order that the source knows who to tell about the event triggered, references to all of these listeners are kept in an internal list (or other iterable collection) within the source object.
Thus, if we want our listener object to get the word that the event happened, it must be included in this internal collection of the source object. As such, we must "register" our listeners with the source object to which they hope to listen -- that is, we must add these listeners to the source objects internal collection. Obviously, this registration must happen before the event happens. For processing a JButton click, this can be accomplished with a call to addActionListener(listener). More generally, as the diagram above indicates, this is accomplished with a call to a method of the form addXListener(listener: XListener).
Once our listener has been registered, we are ready to process an event. In the case of the JButton, this looks like:
| 1. The user clicks on a JButton |
| 2. The JButton triggers and creates an event of type ActionEvent |
3. The JButton goes through its list of listeners and invokes the following methods:
listener1.actionPerformed(event); listener2.actionPerformed(event); listener3.actionPerformed(event); ... |
More generally, things look like this:
| 1. The user or some other object/program affects some source object |
| 2. The source object creates an event of type XEvent |
3. The source object goes through its list of listeners and invokes the following methods:
listener1.handler(event); listener2.handler(event); listener3.handler(event); ... |
Depending on what type of event one is dealing with, the corresponding listener interface may require that more than one handler method be implemented. For example, while a button click event is likely to result only in a single (although possibly compound) action being taken, a window event might want to do different things depending on whether the user attempted to close the window, or open it, or activate it, etc...
Below is a list of some selected Event classes and their associated Listener Interface and handler methods:
| Event Class | Listener Interface | Listener Methods (Handlers) |
| ActionEvent | ActionListener | actionPerformed(ActionEvent) |
| ItemEvent | ItemListener | itemStateChanged(ItemEvent) |
| WindowEvent | WindowListener |
windowClosing(WindowEvent) |
| ContainerEvent | ContainerListener |
componentAdded(ContainerEvent) |
| MouseEvent | MouseListener |
mousePressed(MouseEvent) |
| KeyEvent | KeyListener |
keyPressed(KeyEvent) |
Listener classes are often designed to facilitate the creation of listener objects for some GUI object (e.g., a button, window, checkbox, etc...). In this context, separating the code for the Listener class from the code for the class of the related GUI object seems to, in a certain sense, work against the notion of the benefits of code encapsulation.
Fortunately, in Java, within the scope of one class, we are allowed to define one or more inner classes (or nested classes). (Technically, the compiler turns an inner class into a regular class file named: OuterClassName$InnerClassName.class.
Such inner classes can be defined inside the framing class, but outside its methods -- or it may even be defined inside a method, and they can reference data and methods defined in the outer class in which it nests.
So for example,
public class OuterClass {
    private int data;

    public void myMethod() {
          //Do something
    }

    class InnerClass {
          public void myInnerMethod() {
               data++;                       //we can reference instance
                                             //variables of the outer class,
               myMethod();                   //and we can call methods of
                                             //the outer class
          }
     }
}
We can also create Anonymous inner classes (i.e., inner classes that have no name) to shorten the process of declaring an inner class and creating an instance of that class into one step.
There are some restrictions on creating anonymous inner classes, however. In particular, an anonymous inner class:
Object()
Below is an example of using an anonymous class. The program below creates a form (i.e., a subclass of a JFrame object) with a single button, that when clicked prints a message to the console window:
package simple.button;

public class Main {

	public static void main(String[] args) {
		CustomJFrame myFrame = new CustomJFrame();
	}
}
package simple.button;

import java.awt.event.ActionEvent;
import java.awt.event.ActionListener;

import javax.swing.JButton;
import javax.swing.JFrame;
import javax.swing.JPanel;

public class CustomJFrame extends JFrame{

	private JPanel contentPane;      //This is an invisible layer on
                                         //our JFrame, to which we attach
	                                 //our button and any other
                                         //components we want shown

	private JButton myButton;        //This is the button we will
                                         //attach to the contentPane

	public CustomJFrame() {

	   this.setSize(200,70);        //This sets the dimensions
                                        //of the JFrame

	   contentPane = new JPanel();  //this creates a contentPane for
                                        //holding our button

	   myButton = new JButton("My Button");

	   myButton.addActionListener(
              //here we use an anonymous inner class for the listener
              ///////////////////////////////////////////////////////
		   new ActionListener() {
		       public void actionPerformed(ActionEvent e) {
		          System.out.println("My button was clicked!");
		       }
		   }
              ///////////////////////////////////////////////////////
		);

	   contentPane.add(myButton);  //This attaches the button
                                       //to the contentPane.

	   this.add(contentPane);      //This, in turn, attaches the
                                       //contentPane to the JFrame.

	   this.setVisible(true);      //This makes our JFrame visible.
	}
}
There are some non-GUI components that can also fire events. For example, the Timer class is a source component that fires an ActionEvent at a predefined rate, specified in milliseconds.
| javax.swing.Timer |
|
+Timer(delay: int, listener: ActionListener |
Below, we add a Timer object to the button form created in the last section. This Timer object will fire off an ActionEvent every second (i.e., 1000 milliseconds), displaying a message in the console window each time it does so:
package simple.button;

public class Main {

	public static void main(String[] args) {
		CustomJFrame myFrame = new CustomJFrame();
	}
}
package simple.button;

import java.awt.event.ActionEvent;
import java.awt.event.ActionListener;

import javax.swing.JButton;
import javax.swing.JFrame;
import javax.swing.JPanel;

public class CustomJFrame extends JFrame{

	private JPanel contentPane;      //This is an invisible layer on
                                         //our JFrame, to which we attach
	                                 //our button and any other
                                         //components we want shown

	private JButton myButton;        //This is the button we will
                                         //attach to the contentPane

	public CustomJFrame() {

	   this.setSize(200,70);        //This sets the dimensions
                                        //of the JFrame

	   contentPane = new JPanel();  //this creates a contentPane for
                                        //holding our button

	   myButton = new JButton("My Button");

	   myButton.addActionListener(
		   new ActionListener() {
		       public void actionPerformed(ActionEvent e) {
		          System.out.println("My button was clicked!");
		       }
		   }
		);

	   contentPane.add(myButton);  //This attaches the button
                                       //to the contentPane.

	   this.add(contentPane);      //This, in turn, attaches the
                                       //contentPane to the JFrame.

	   this.setVisible(true);      //This makes our JFrame visible.

           //here we define the TimerListener class and Timer...
           ///////////////////////////////////////////////////////
           class MyTimerListener implements ActionListener {
		public void actionPerformed(ActionEvent e) {
			System.out.println("My timer fired an ActionEvent!");
		}
	   }

	   MyTimerListener listener = new MyTimerListener();

	   Timer myTimer = new Timer(1000, listener);   //Here we specify
                                                        //a 1000 millisecond
                                                        //delay

           //Note: the constructor for this Timer class registers the listener.
	   ///////////////////////////////////////////////////////

	   myTimer.start();
	}
 }